Thursday, February 11, 2016

Hit Me With Your Best (B12) Shot


After a long weekend, or even long work week, it's hard to get in the game.  For me, that was today.  I even broke my 'one red bull a day' rule!  That was when I remembered my sweet friend, Vitamin B12.  It is the best natural pick me up.  It is awesome at fighting fatigue and beating those 'I want to be lazy' symptoms.  Sure, any B12 will do, but I recommend B12 shots.  They have some amazing benefits to our daily and overall well being.

Energy:  decreasing fatigue and lethargy are the key to energy production

Healthy heart:  protects against strokes, high blood pressure, and can even play a part in improving cholesterol levels.

Hair, Skin, and Nails:  B12 promotes cell reproduction which makes those three super pretty.

Increased Metabolism:  B12 plays an important role in converting carbs, proteins, and fats in the body;  helping to maintain a healthy digestive system.

Sure you can get a good dose of vitamin B12 in some foods (eggs, seafood, poultry, cheese. etc.)  But, my favorite, quickest, and most effective source is the good ol' booty shot!  Because vitamin B12 needs to be absorbed into the blood stream, most other supplements don't work as well.  So, if you have access to the injections, I suggest you go for it.  If not, come visit us at Complete Hormone Solutions and get your quick fix!


www.completehormonesolutions.com


Monday, September 30, 2013

Checkered Cake

Birthday cakes are always and will always be a huuuge part of birthday parties.  Especially for the 4 year old diva that is my mini.  Having fun decorations and icing on the outside is great, but why not make the inside just as awesome!?
Please excuse the photo quality in this post.  They are all taken from my phone.  I will definitely not be winning any photography awards with them :))

Michaels and other craft stores sell tools to make cakes like this but today I am going to show you how to make it simply with things you will more than likely already at your house.

What you will need:
2 boxes of cake mix and ingredients it calls for
frosting (store bought or homemade)
food coloring
one small circle cookie cutter
one medium-large cookie cutter
long knife

First, you will bake your cakes according to the instructions on the box.  If you want rainbow, add food coloring to your cake mix. (2 boxes will make 4 9 in round cakes)  Once they are done and have cooled off to touch, take your long knife and slice the top of the cake to take off the "hump".
(the top piece will not be used in the cake so you can do as you please with it)

Next, with your small cookie cutter, carefully cut out the center of the cake and set to the side.  
Then, repeat with the larger cookie cutter.


You will end up with 3-4 outer rings, middle rings and center circles.

Now, you will piece the cake together.  You will want to add a small amount of frosting to the inside of each ring to hold them together.


 Once you have put your puzzle together, your layers should look similar to this.  
And now I suddenly want to go to target!

Add a layer of frosting to the top of 2 layers and stack away.

At this point the cake is not going to look beautiful, so don't get down.

Imperfections create perfection and originality!


Fill in any holes with frosting and ice away.


I used homemade buttercream on the inside and chocolate buttercream on the outside.


And voila! You now have a cake that will make all the kids think you are the coolest ever!


Wednesday, July 17, 2013

Bedtime Solutions

I don't know about you but, our neighborhood is loaded with monsters and witches.  Those darn things make it almost impossible to get a 4 year old to sleep.  Lucky for us, we found some handy anti-monsters, bad guys, and witches spray (water in a squirt bottle) under the kitchen sink.


The trick to it is that you have to spray it outside all doors that go outside.
So, we spray it out the front and back door. 


Just to be on the safe side, we spray it at the bottom of the stairs just in case one of those pesky monsters squeezes through the cracks.


Now here's the best news, Kody woke up saying, "Mommy! The monster spray worked!!"  Phew, I'm glad we got those darn things under control.

Tuesday, June 18, 2013

Side Walk Chalk Art

Kody and I love coloring on the driveway with chalk.  Becoming a part of the picture has become one of her new favorite things to do.


Monday, June 17, 2013

Behavior Chart


I don't know about you but, I have got a 4 year old who has completely found her attitude!  Her teachers at school say she is just the sweetest thing ever.  I'm convinced they have her confused with a different child.  So, it is my mission to find that well behaved little girl and enjoy time with her at home.


I found some little charts with every character you can think of on www.freeprintablebehaviorcharts.com and printed out a bunch of different characters for a few weeks.


For every thing she does, she gets a sticker.  At the end of the week if she has all of her stickers (I might change it all but one or two...haven't decided) she gets to chose a Popsicle stick from the jar.

Each stick has a different activity that we will do that weekend.

                           
- feed the duck
-go to the library
-movie night
- slumber party in living room
-childrens museum
- go to the movies
- get ice cream
- eat at red robin (her favorite restaurant)
- have a picnic
- go swimming
- horseback riding
- go bowling
- ice skating
- bounce house
- get a new toy
- alphabet tour


Saturday, October 13, 2012

Tonsillectomy Recovery- Day 3

Day 3!!


Phew...day 3 you have officially kicked my butt!!  I woke up around 4am pretty sore so I got some more pain meds and ice and passed back out.  My mom took me to my house to get some more clothes and I decided to take a bath while I was there.  BAD IDEA!  It was fine until I leaned back to wash my hair and at that point I thought I was going to suffocate.  No good.  Following along with the bad ideas, my daughter had a birthday party to go to this afternoon at a horse stable.  I definitely should have sat that one out.  We got back to my moms house, I had some trusty mashed potatoes, loaded up on meds and ice, and hit the pillow filled bed.  

This is the best way I can describe to you how the day has played out haha

morning...

afternoon...

evening...


Friday, October 12, 2012

Tonsillectomy Recovery- Day 1 & 2

Day 1!!
So far so good!  I had to be at the surgery center at 6:30 and was back at my moms house around noon.  I remember being rolled into the OR with two gorgeous nurses and having major girl talk (not sure about what) with them as I switched beds.  Then I woke up in an awesome recovery room where I slept for a few hours after that. 

For some reason I expected to have no voice afterwards but, I woke up just a talkin!  My nurse gave me a cup of the best vanilla pudding I've ever had, gave me pain meds, and sent me on my way.

In all of my research I did before surgery, the biggest tip I found was to sleep in a recliner and not a flat bed.  Apparently being upright keeps your throat from drying out.  So, I did just that.  I spent a majority of the day sleeping in the recliner with an ice pack on my neck.  OH!  and for some reason I had a really weird snore?? I don't snore so I'm gonna be pissed if after this I do.  In my short breaks from sleeping, lots of apple juice and pudding/jello accompanied my big bottle of happy meds!

As you can imagine, juice, pudding, and jello are not very filling.  Definetly after nothing to eat since dinner the night before.  So I tried some mashed potatoes.  I made sure they weren't very hot and ate them pretty slow.  I got them down and my tummy was then full! YAY!

They say the first day is cake compared to the rest...I guess we shall see.


Day 2!!

Still going strong!  I woke up in the recliner, throat felt fine still, the rest of my body is a different story.  Fortunate for me, I have the sweetest almost 4 year old ever.  She got out of her bed and hopped in the recliner with me and we watched cartoons on her kindle.  Right as I'm about to eat my pudding for breakfast she says to me "Mommy, can I feed you?" Ah melt my heart!  So she "fed me like a baby"  with the open wide here comes the choo choo haha.

Knock on wood...don't want to jynx myself here but, I've had strep that hurt worse than my throat does now.  Just feels like a lump in the back of my throat...not so much painful as uncomfortable.  The worst part is my tongue from where they clamped it down on the sides during surgery.  I've cut my pain med dosage in half and continue to drink lots of cold apple juice and keep my ice pack on.

I've now moved every pillow in my mothers house onto the guest bedroom so I can be sitting up and have lots of leg room...much better than the recliner!

End of day 2 and my voice is gone! :((

Sunday, July 22, 2012

Stuffed Zucchini


These are not only super easy to make but they are also very quick.  I actually found a recipe online that I thought sounded so yummy but, then couldn't find it again.  So, I made this one up with things I already had at home.

All you need:
  • Zucchinis
  • 1 roma tomato (diced)
  • 1/4 cup diced onions (diced)
  • 1 cup of croutons (crumbled)
  • 2-3 tablespoons of caeser dressing
  • shredded cheese
Directions:
Slice the zucchini down the middle long ways.  With a spoon scoop out the inside of them leaving enough around the edges so that it doesn't become flimsy.  Chop the zucchini filling pretty fine.  Dice the tomato using only the outside of the tomato; the juice and seeds of the tomato will make the stuffing mixture too liquidy.  Combine the diced onion, tomato, crumbled croutons, caeser dressing, and zucchini in a bowl and mix.  Spoon the mixture into the zucchini "boats" and top with shredded cheese.  Bake at 375 degrees for 15 minutes or until heated through.

I put my zucchini boats over a plate of pasta to make a more filling meal out of it.


Southwestern Stuffed Peppers


I love making things that look fancy but were actually super easy to make and these def fall into that category!!

All you need:
  • Bell peppers 
  • your choice of meat (I used ground turkey)
  • 1 package of taco seasoning
  • 1 jar of salsa
  • 1 can of black beans (rinsed and drained)
  • 1 cup of frozen corn
  • shredded cheese (I used the mexican blend)
  • sour cream
  • fresh cilantro
Directions:

Literally the hardest part of this is cutting the peppers in half.  You can cut the stems off if you want and it would probably be easier but, I think the stem makes them look fancier :))  After you cut the peppers rub a little olive oil on them and bake them at 425 degrees for about 15 minutes.

While the peppers are in the oven, brown your meat and add taco seasoning according to package.  Next, add the salsa, beans, and corn to the meat.

When the peppers are done, let them cool to touch so you can fill them easily.  Stuff the mixture into the peppers and bake at 400 degrees for another 15 minutes.  

After the 15 minutes, take the peppers out and sprinkle the shredded cheese on top of each pepper.  Place them back in the oven for 5 minutes or until the cheese is melted.

Remove peppers from the oven and top each one with sour cream and fresh cilantro.

Tuesday, April 10, 2012

Easter Snacks

I wanted to make something fun for Kody to take to the kids in her preschool class for Easter this year.  Instead of doing the same ole candy in a plastic egg I made birds nests!


All you need...
  • Rice crispy cereal
  • Marshmellow creme
  • coconut
  • green food coloring
  • frosting
  • M&Ms (or any other candy for the eggs)

  1. Make the rice crispy treats as normal.
  2. I put them in a mini muffin pan to get the shape
  3. Add a little green food coloring to the coconut for the grass
  4. Spread a little frosting on the top of the treats and sprinkle the colored coconut over it.
  5. Add a dab of frosting to the bottom of the candy so they will stay put in the "nest"

I individually wrapped each one and put a little Happy Easter note in them.  
The kids LOVED them!


Thursday, January 5, 2012

How to clean a glass cooktop

So, when I got my glass top stove I thought that it would be way easier to clean because it was smooth.  Boy was I wrong!  I feel like I scrub and scrub and nothing happens.  


Well, finally I've found the trick!  

All you need:
-bowl of hot water and soap
-dish rag
-baking soda

Fill your bowl with hot water and soap then submerge your dish rag in the bowl.


Sprinkle the baking soda over the effected areas.
(which in my case is the entire thing!)


Pull the rags out of the soapy water and ring out about half of the water.  You don't want them to be super soggy.  Then, lay the rags out flat over the baking soda.


Let that sit for  15-20 minutes...
Scrub the surface with the rags...
(wear gloves...the baking soda might be harsh on the skin)
rinse with water...
shine it up with some windex...
and tada!  you have a clean stove top!!

Ear Ring Holder


I bought this picture frame at Michaels in the "damaged" 
bin for $4...the back was broken.  Well guess what...I have no need for a back to make this ear ring holder.  Seriously, glue a few strips of lace ribbon to the back and there you go...a super easy, decorative ear ring holder.  You can add some to the top and hang it or simple prop it up on the counter.


Wednesday, January 4, 2012

Present Name Tags

So, this year for Christmas, instead of putting traditional ole sticker tags on the presents we made our own.  Literally, we made tags for all of the presents for $3.  I got a pack of multi colored foam paper sheets and 2 packs of different colored glitter from the dollar store.  Instead of writing everyones names, we just did the letter their name starts with.  I cut the letters out and kody spread the glue and sprinkled the glitter.  

Hand Prints

Kody and I both love doing crafts, painting, etc.  So this time we did a project together.  I love this idea so much!  I was so simple, and could even work for daddy, mommy, and baby hands...if daddys hands are significantly larger than mommys of course.

Monday, October 31, 2011

Recycling Wine Bottles

I love making things out of wine bottles.  Not only does it give you a super cute decoration piece but it gives you, what I call, a good reason to drink what's in the bottle!


All you need:
-empty wine bottle
-hot glue gun
-spray paint


First, come up with a word/short phrase of your choice and write it out on the bottle with the hot glue gun.  If you are writing more than one word it might be easier if you write it out with a sharpie first then go over it.


Next, spray paint the entire bottle the color of your choice.  I sprayed mine white this time only because that was the only color I had in my garage.


I got really excited and impatient so I went ahead and took a picture, but this looks even better with a flower in it, sitting on my dresser!!

Monday, October 17, 2011

Yarn Wreath

It seems like everyone I know is making these yarn wreaths and I'm kind of liking them so I had to try it out for myself.  It was very time consuming but it is a great, fun craft to do while sitting on the couch watching tv.


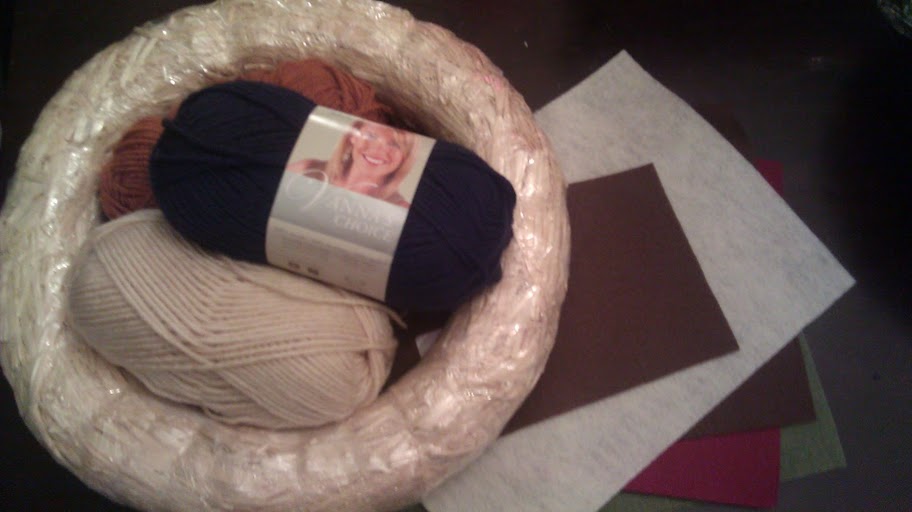
You'll need a straw wreath (I kept the plastic on mine), yarn obviously (I used 3 different colors of Vanna's Choice yarn because it was 2 for $5 at Michaels), and a few sheets of felt for some cool little flowers (or any other added optional addition).


To start, tie a knot and you'll do the same to finish.  All you do is wrap it around the straw wreath.  Simple, huh?  At first I tried to line the yarn up all the way around but that was a little too tedious for me.  Imperfections create perfection and originality!


If you want to add some fun felt flowers it takes one sheet of felt per flower, for the bigger ones.  Start by cutting waves around the sheet to take off the straight edges.  Then you will cut a big spiral in the sheet.  Once you have done that, start with the tiny inside end of the spiral and just wrap the rest around.


Attach the flowers or any other decoration piece of your choice and voila!